


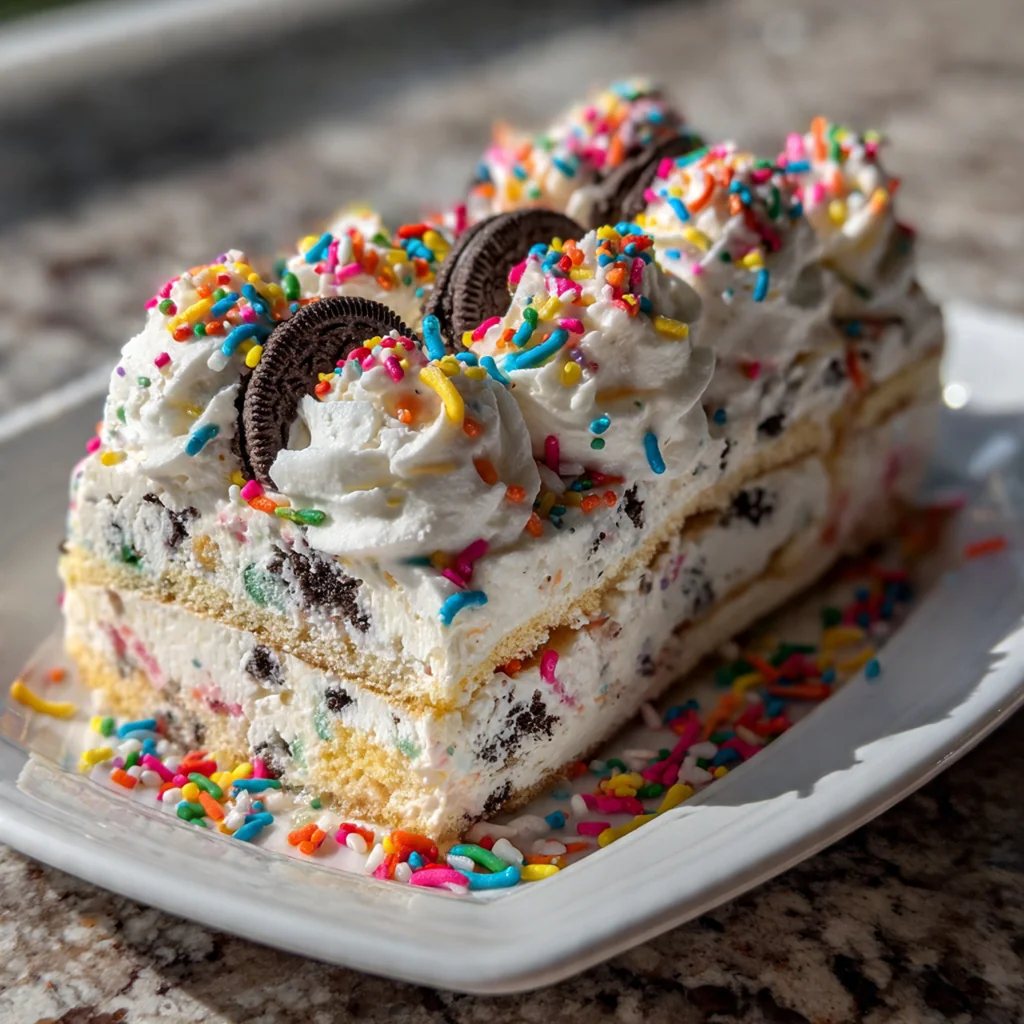
This Funfetti Oreo Icebox Cake is my go-to celebration dessert because it brings pure joy to the table without turning on the oven. It’s a classic American treat that layers creamy, sprinkle-filled filling with crunchy chocolate cookies for a textural dream. The magic happens in the fridge, making it the ultimate make-ahead dessert for busy hosts. You get all the nostalgic flavor of funfetti cake with the satisfying crunch of an Oreo, and everyone always asks for the recipe.
Why You'll Love This Recipe
- No oven needed just mix, layer, and chill
- It combines funfetti sprinkles and Oreo cookies perfectly
- Kids adore it and adults can’t resist the creamy layers
- Make it ahead so you’re not stressed when guests arrive
- I bring this to every potluck and never bring any home
Ingredients You’ll Need
- Funfetti cake mix: this becomes the dry base for your creamy filling, and heat-treating it is essential for food safety and toasting its flavor, just look for the classic 15.25-ounce box.
- Whole milk: it thins the cream cheese mixture to a spreadable consistency without making it runny, full-fat milk gives the richest, creamiest results.
- Cream cheese: softened cream cheese is the foundation of your lush filling, letting it get truly room temp ensures a perfectly smooth mix with no annoying lumps.
- Powdered sugar: it sweetens the cream cheese layer and helps stabilize it, sifting it first prevents any gritty texture in your final cake.
- Vanilla extract: a splash of pure vanilla rounds out all the sweet flavors and adds that classic bakery aroma, don’t skip it.
- Cool Whip: this light, fluffy whipped topping makes the filling airy and dreamy, be sure it’s fully thawed so it folds in evenly.
- Oreo cookies: they provide the essential chocolatey crunch between the creamy layers, classic Oreos work best for that familiar taste everyone loves.
- Rainbow sprinkles: the star of the show that gives the funfetti look and a little sugary texture, jimmies or quins hold their color best.
How to Make It
Heat-Treat the Cake Mix:
Preheat your oven and spread the dry cake mix on a baking sheet. Baking it for just five minutes heats it enough to be safe for a no-bake recipe. Let it cool completely before you use it so it doesn’t melt your creamy filling.
Whip the Cream Cheese Base:
Beat the softened cream cheese in a large bowl until it’s completely smooth and creamy. This should take about two minutes with a mixer. Starting smooth here is the secret to a lump-free filling later on.
Incorporate Sugar and Vanilla:
Add the powdered sugar and vanilla to the whipped cream cheese. Beat everything on medium speed until it’s fully combined and you don’t see any lumps of sugar. Scrape down the sides of the bowl once to make sure.
Stream in the Milk:
With your mixer on a low setting, gradually pour in the milk. Keep mixing until the milk is fully incorporated and the mixture looks uniform and smooth. This step creates the perfect pourable, spreadable base.
Fold in the Cake Mix and Sprinkles:
Use a spatula to gently fold the cooled, heat-treated cake mix and your rainbow sprinkles into the cream cheese mixture. Fold just until everything is evenly distributed and you have a thick, colorful batter.
Lighten with Cool Whip:
Add the thawed Cool Whip to the bowl. Gently fold it into the funfetti batter until the mixture is fluffy and you don’t see any white streaks. Be gentle to keep all that airy volume.
Build the First Layers:
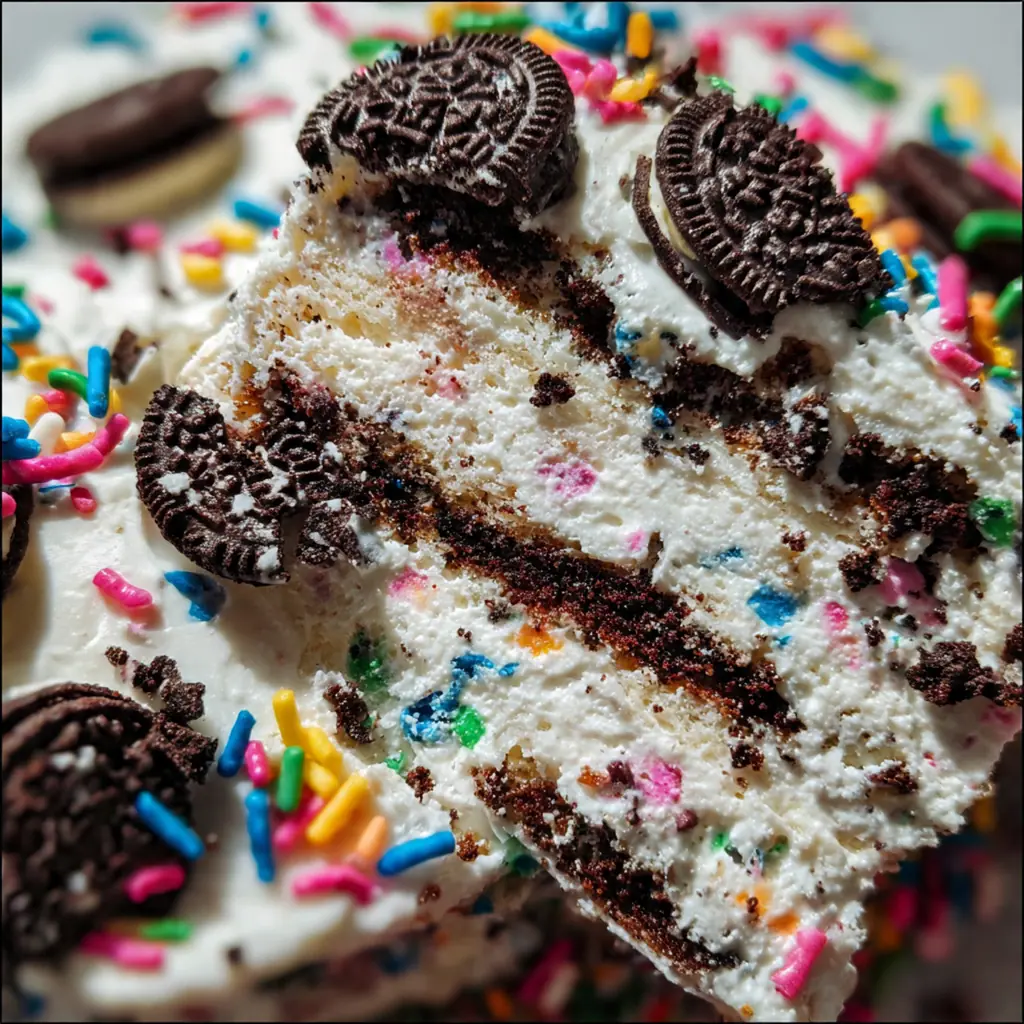
Spread a thin layer of the funfetti cream on the bottom of your baking dish. Arrange a single layer of Oreo cookies over the cream, breaking a few to fill in gaps. This first cookie layer soaks up moisture and becomes deliciously soft.
Repeat and Finish the Layers:
Spread half of the remaining cream over the Oreos, then add another cookie layer. Top it all with the last of the cream, smoothing it to the edges. Now is the time to add any extra sprinkles or crushed Oreos on top.
Chill to Set:
Cover the dish tightly with plastic wrap and refrigerate it for at least four hours, though overnight is ideal. This chill time is non-negotiable as it lets the cookies soften and the layers firm up for perfect slices.
You Must Know
- Heat-treating the cake mix is crucial for safety
- Let the cream cheese soften completely to avoid lumps
- Chilling overnight gives the cleanest slices
- That creamy, crunchy texture is worth the wait
Storage Tips
Keep your Funfetti Oreo Icebox Cake covered tightly with plastic wrap or in an airtight container in the refrigerator, where it stays fresh and fabulous for up to three days. The texture is best enjoyed within that time, as the cookies will continue to soften beautifully. I don’t recommend freezing this cake because the dairy can separate and become grainy when thawed, so just enjoy it chilled over a few days.
Ingredient Substitutions
If you prefer homemade whipped cream, you can whip two cups of heavy cream with a quarter cup of powdered sugar until stiff peaks form and use that in place of the Cool Whip for a richer flavor. For a different cookie twist, try golden Oreos or even mint Oreos to change up the flavor profile while keeping the same great texture. While the funfetti cake mix is key for flavor, in a pinch you could use a plain white or yellow mix and just increase the rainbow sprinkles you fold in.
Serving Suggestions
Serve this cake chilled, cut into neat squares with a sharp knife dipped in hot water for those picture-perfect edges. I love adding a little extra dollop of whipped cream and a few more sprinkles on each plate for a truly festive touch. It pairs wonderfully with a glass of cold milk for the kids or a scoop of vanilla ice cream on the side for an over-the-top treat.
Cultural Context
The icebox cake is a wonderfully American invention, born from the early 20th-century innovation of the home refrigerator, which was often called an icebox. These no-bake desserts relied on packaged cookies and whipped cream or pudding, becoming a staple for busy home cooks, especially in the warm summer months. This version is a modern twist that marries two iconic packaged joys—Oreos and Funfetti cake mix—celebrating that same spirit of easy, joyful entertaining that requires more assembly than actual cooking.
Pro Tips
- Use a hot knife for the cleanest slices
- Chilling overnight is better than just four hours
- Fold the Cool Whip gently to keep it fluffy
- I always make it the day before a party
Frequently Asked Questions
Use a standard 15.25 oz box of Funfetti cake mix for the signature colorful sprinkles. The dry mix is used without baking to create a sweet, crumbly layer that softens perfectly when chilled with the creamy filling.
Absolutely! This no-bake cake is ideal for making ahead. Prepare it up to 24 hours in advance and let it set in the refrigerator. The longer it chills, the softer the Oreo layers become, making it even more delicious.
You can use an equal amount of freshly whipped heavy cream sweetened with a tablespoon of powdered sugar. Beat 1 ½ cups of cold heavy cream until stiff peaks form, then fold it into the cream cheese mixture as you would the Cool Whip.
The cake is ready to serve after chilling for at least 4 hours. The layers will be firm, and a knife inserted will go through smoothly. The Oreos will have softened to a cake-like texture, which is the hallmark of a perfect icebox cake.
Serve this festive American dessert on its own or with a scoop of vanilla ice cream. A cold glass of milk or a cup of coffee perfectly complements the sweet, creamy layers and chocolate Oreo crunch.